Halloween Crochet Gnome Pattern: 11 Amazing Tips
Halloween Crochet Gnome Pattern: 11 Amazing Tips
Spooky enough for October. Cozy enough to keep on display all season.
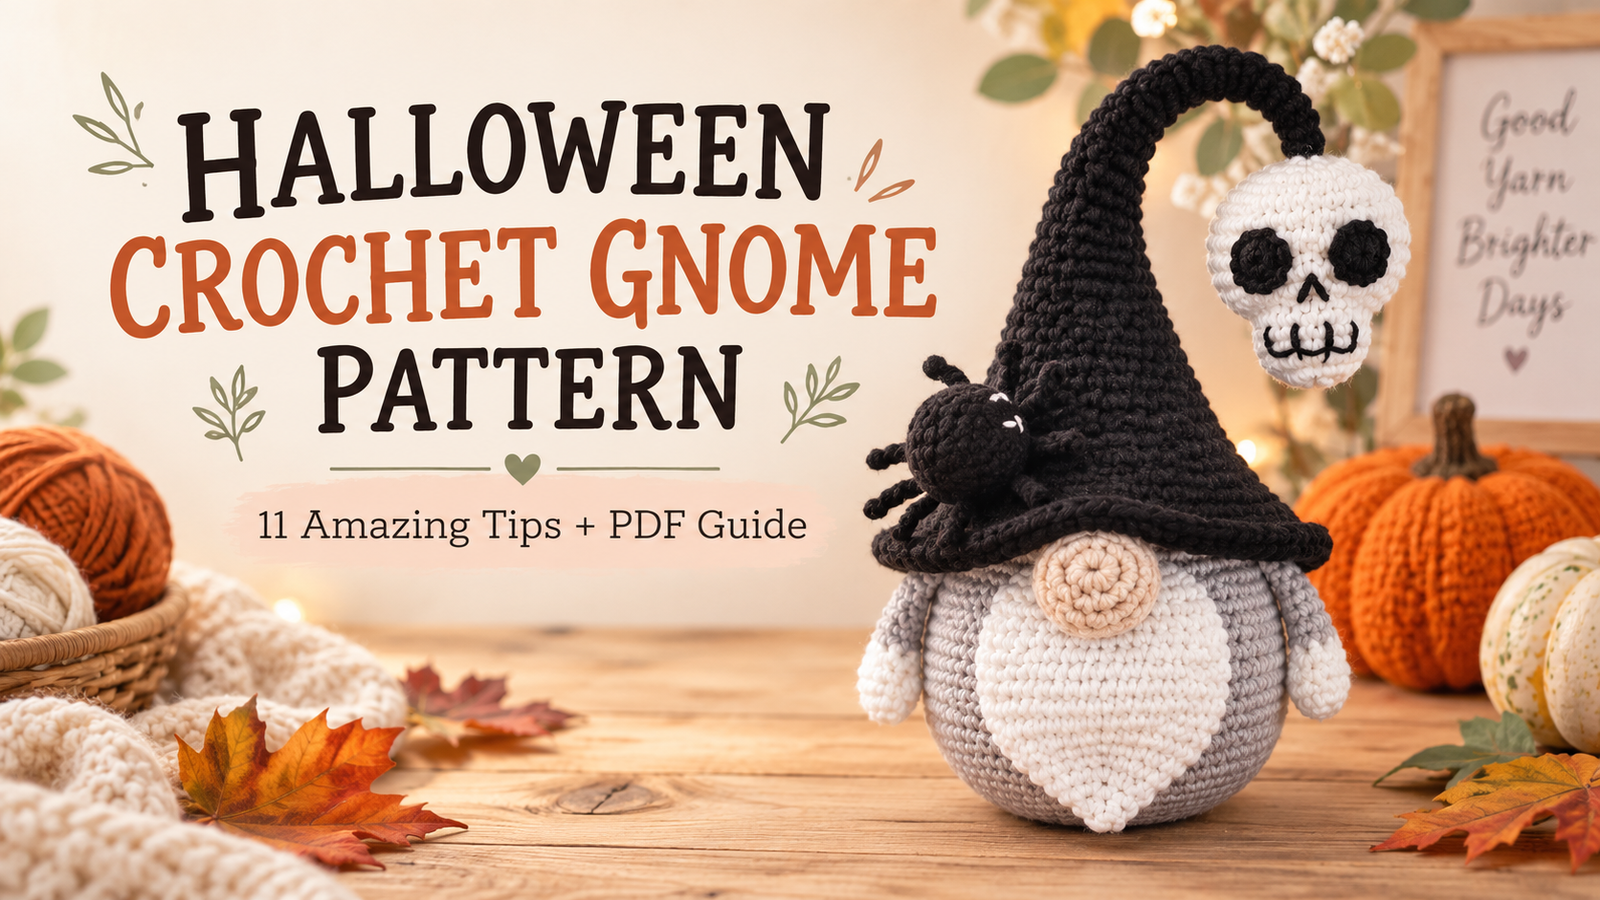
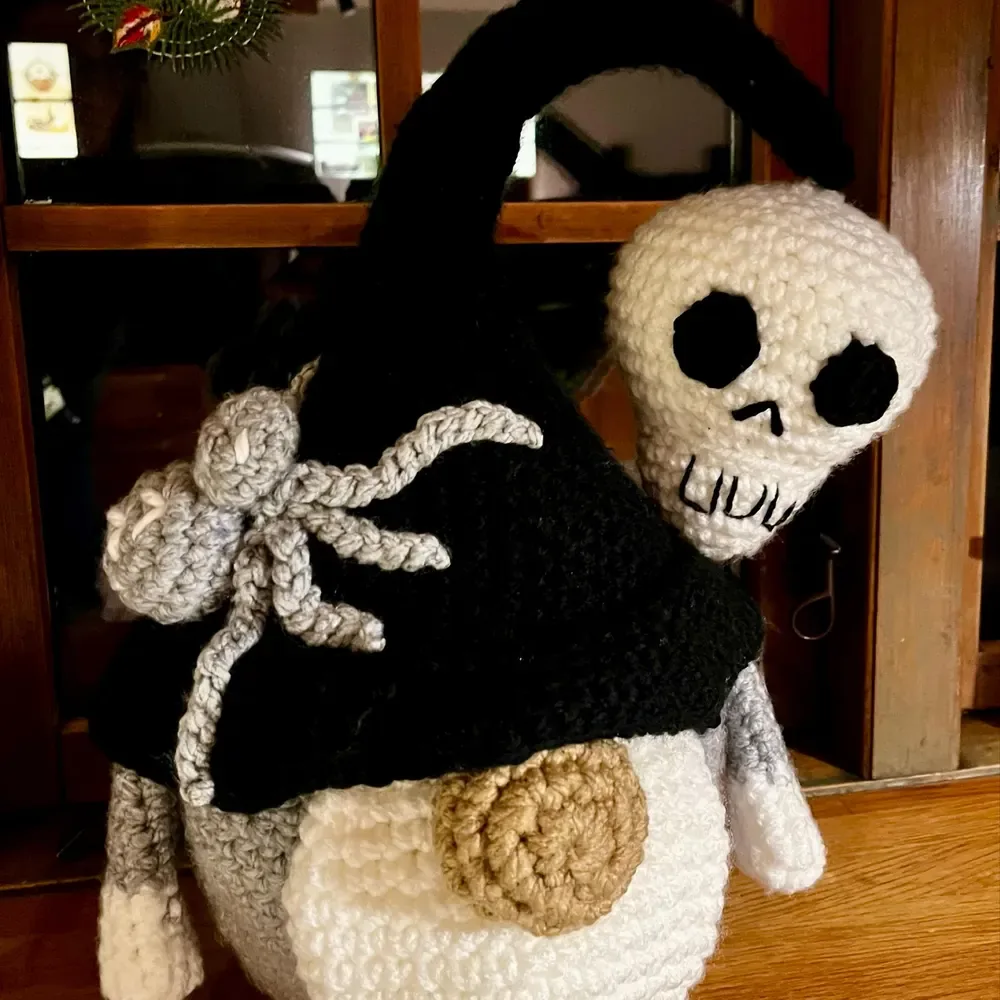
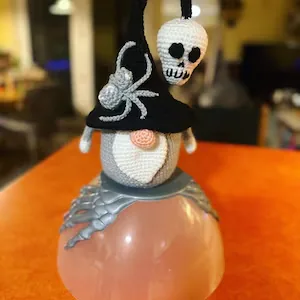
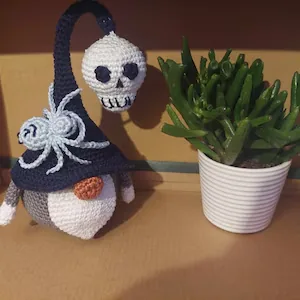
This Halloween crochet gnome pattern mixes a soft amigurumi body with a dramatic witch hat, dangling skull, and creepy-cute spider—so you get a project that feels handmade, playful, and unmistakably Halloween.
READY TO START?
Keep the exact pattern beside your yarn.
Use the full Halloween Gnome & Spider PDF when you need the precise rounds, shaping, stitch counts, and assembly order.
Get the Gnome Crochet PDF Pattern →As you work through this Halloween crochet gnome pattern, keep checking the overall balance of the body, hat, and accessories rather than judging each piece on its own.
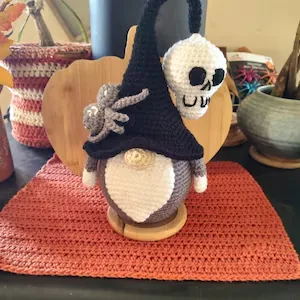
If you love spooky handmade décor but still want your Halloween projects to feel cozy, playful, and full of personality, this Halloween crochet gnome pattern is exactly the kind of project that stands out. The finished character mixes several classic Halloween details in one memorable amigurumi-style design: a soft round gnome body, a dramatic pointed witch hat, a dangling crochet skull, and a creepy-cute spider resting on the hat. The result feels spooky enough for October while still keeping the warm handmade charm that makes crochet decorations so special.
This article is a complete guide to the design, color choices, materials, construction strategy, finishing ideas, troubleshooting tips, and display options. It is not meant to replace the stitch-by-stitch pattern. Instead, it helps you understand how the project comes together so you can crochet with more confidence and get a cleaner finished result. If you want the exact instructions, stitch counts, shaping sequence, and assembly details, you can use the printable PDF pattern linked throughout this guide.
Why This Halloween Crochet Gnome Pattern Is So Eye-Catching
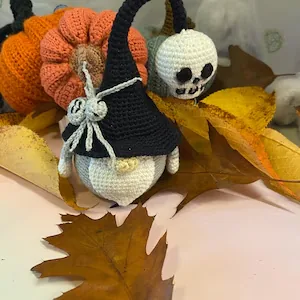
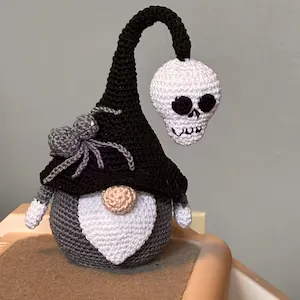
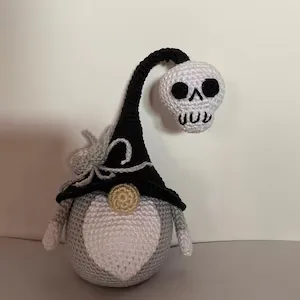
The strongest part of this design is its silhouette. Even from across a room, the tall curved hat immediately reads as Halloween. The soft round body underneath gives the character a friendly shape, while the skull hanging near the tip of the hat introduces the spooky element. Then the spider adds a second layer of detail without making the project look overcrowded. That balance between simple shapes and strong Halloween symbols is what makes the project work so well.
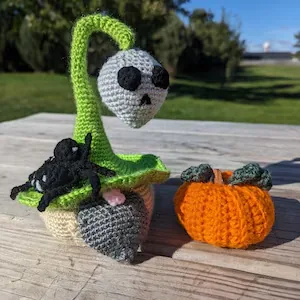
Another reason the Halloween crochet gnome pattern photographs beautifully is the contrast between the main colors. In many versions, the hat is deep black, the skull and belly are cream or white, and the body is a muted gray. These high-contrast areas make the face, hat, and accessories easy to see even in small Pinterest images. You can also switch the hat to pumpkin orange, toxic green, purple, or another Halloween shade and still keep the same recognizable character.
The design is also flexible. Some finished versions can feel cute and whimsical, while others can look darker and more gothic. Small changes in yarn color, skull expression, spider placement, or background décor can completely change the mood. That makes the pattern useful not only as a one-time Halloween project, but as a base for a small collection of seasonal gnomes.
As you work through this Halloween crochet gnome pattern, keep checking the overall balance of the body, hat, and accessories rather than judging each piece on its own.
Halloween Crochet Gnome Pattern: Project Overview
Before you begin, this Halloween crochet gnome pattern overview helps you understand the project level, main components, and the skills you will use.
| Project style | Halloween amigurumi / crochet gnome décor |
| Main design elements | Round gnome body, pointed hat, skull, spider, arms, nose and belly panel |
| Suggested skill level | Confident beginner to intermediate, depending on your amigurumi experience |
| Useful techniques | Working in rounds, increases, decreases, stuffing, sewing, embroidery and small-part shaping |
| Best season | Autumn and Halloween |
| Pattern format | Digital PDF available instantly online |
As you work through this Halloween crochet gnome pattern, keep checking the overall balance of the body, hat, and accessories rather than judging each piece on its own.
What You Will Learn in This Guide
- How the gnome design is structured
- What yarn, tools, and materials to prepare
- How to choose a Halloween color palette
- Which crochet skills are most useful
- How to approach the construction in a logical order
- How to assemble the pieces cleanly
- Ways to customize the skull, spider, and hat
- Common mistakes and how to fix them
- Ideas for displaying your finished Halloween gnome
- Frequently asked questions
As you work through this Halloween crochet gnome pattern, keep checking the overall balance of the body, hat, and accessories rather than judging each piece on its own.
Understanding the Design Before You Crochet
Understanding the structure of this Halloween crochet gnome pattern first makes every later step easier, from shaping the body to positioning the skull and spider.
Before starting any detailed amigurumi project, it helps to mentally separate the finished figure into simple components. This Halloween gnome looks complex because several details are layered together, but the basic construction is much easier to understand when you break it into sections.
The body is the visual foundation. It is rounded, slightly egg-shaped, and wide enough to support the tall hat. A contrasting belly section gives the front of the body more definition. The nose sits near the upper center and helps establish the familiar gnome look even though the face is mostly hidden. Small arms fall at the sides, keeping the body balanced without distracting from the hat.
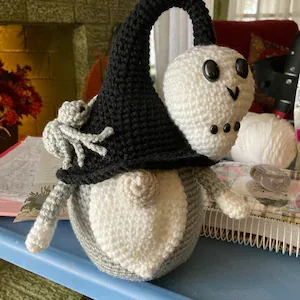
The hat is the most important feature. It begins wide at the brim and narrows into a long curved tip. That exaggerated shape creates movement and gives the character its spooky witch-like personality. The skull hangs or rests near the upper part of the hat depending on the version. A crochet spider sits on the side, usually with its legs spread across the hat so it remains visible from the front.
When planning your Halloween crochet gnome pattern, think in layers: body first, then belly and nose, then hat, then skull, then spider, then final decorative details. This order prevents you from attaching tiny pieces too early and accidentally crushing or twisting them while finishing the larger parts.
As you work through this Halloween crochet gnome pattern, keep checking the overall balance of the body, hat, and accessories rather than judging each piece on its own.
Materials for a Clean, Professional Finish
For the cleanest result, prepare the materials for your Halloween crochet gnome pattern before you start so you can keep your tension and color choices consistent.
The exact yarn amounts and pattern-specific requirements are best taken from the PDF, but you can prepare the general materials in advance. For a project like this, consistency matters more than using a specific brand. Choose yarns that behave similarly so the body, hat, skull, and spider all have a cohesive texture.
A smooth medium-weight or similar amigurumi-friendly yarn is a practical choice because it gives enough structure to the body and hat while still showing the stitches clearly. Cotton and cotton blends can create crisp stitch definition, while acrylic yarns are usually soft, widely available, and easy to work with. If you choose fuzzy or highly textured yarn, remember that it can make small details such as the skull features harder to embroider neatly.
You will typically want black or another dark shade for the hat and spider, cream or white for the skull and belly, gray for the body, and a small amount of beige, tan, peach, or another skin-like shade for the gnome nose. You may also need a contrast color for embroidered facial details.
Besides yarn, prepare a crochet hook suitable for your yarn, polyester fiberfill, a yarn needle, scissors, stitch markers, pins, and embroidery thread or a small amount of contrasting yarn. Pins are especially useful for this design because the skull and spider should be positioned carefully before you sew them in place. If you enjoy highly precise amigurumi finishing, a few locking stitch markers can also help you align the belly, nose, arms, and hat.
If you are completely new to crochet and want to practice the basic motions first, visit our how to crochet for beginners guide. Practicing tension, single crochet, increases, and decreases on a small swatch can make the gnome project much more relaxing.
As you work through this Halloween crochet gnome pattern, keep checking the overall balance of the body, hat, and accessories rather than judging each piece on its own.
Choosing the Best Halloween Color Palette
The classic palette for this project is black, gray, cream, and a soft neutral nose color. It works because the black hat frames the pale skull, while the gray body separates visually from the white belly. If you want your Halloween crochet gnome pattern to match a specific decorating style, however, there are many other combinations that work beautifully.
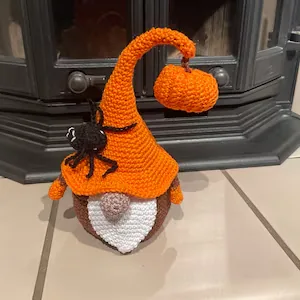
For a traditional Halloween look, use pumpkin orange for the hat, black for the spider, cream for the skull, and medium gray for the body. For a gothic look, keep the hat black, change the body to charcoal, use ivory instead of bright white, and add deep burgundy embroidery. For a playful modern palette, use lime green, black, white, and a small amount of purple. A cottage-style version can use warm beige, rust orange, oatmeal, brown, and muted black.
Try to keep one strong dark color and one clear light color in the palette. The skull needs enough contrast to remain readable as a skull, especially if you plan to photograph the finished gnome for Pinterest or display it in a busy Halloween arrangement.
As you work through this Halloween crochet gnome pattern, keep checking the overall balance of the body, hat, and accessories rather than judging each piece on its own.
Crochet Skills That Make This Project Easier
A few reliable amigurumi skills will make this Halloween crochet gnome pattern feel much easier and help the finished gnome look neat and balanced.
You do not need to be an expert to enjoy this project, but several basic amigurumi skills will help. The body and many small pieces are likely worked in continuous rounds, so a stitch marker is useful for tracking the beginning of each round. You should feel comfortable making increases and decreases while keeping your tension even.
Invisible decreases are especially helpful on rounded amigurumi shapes because they reduce the appearance of gaps. Neat color changes are useful for the belly or other contrasting sections. Sewing is also important because the final look depends on the placement of the hat, skull, spider, and arms. Even beautifully crocheted pieces can look uneven if they are attached at different heights or angles.
Embroidery adds character to the skull. Small eye shapes, a nose opening, and teeth can create the expression without adding bulky pieces. If embroidery makes you nervous, practice on a spare crochet circle first. Use small stitches, keep the tension gentle, and check the face from a normal viewing distance instead of judging every thread from two inches away.
The Halloween crochet gnome pattern is also a good opportunity to practice shaping. The long hat must curve intentionally rather than collapsing randomly. Stuffing choices, stitch tension, and where the hat is attached all influence that final curve.
As you work through this Halloween crochet gnome pattern, keep checking the overall balance of the body, hat, and accessories rather than judging each piece on its own.
How to Approach the Construction Step by Step
Use a calm step-by-step approach to your Halloween crochet gnome pattern so each piece is finished cleanly before you move to the next detail.
1. Crochet the Main Body First
Start with the largest piece because it establishes the scale of everything else. Keep your stitches firm enough that the stuffing will not show through. If your crochet naturally has loose tension, consider using a slightly smaller hook than you would use for a drapey garment. Amigurumi usually looks best when the fabric is dense and structured.
As the body grows, add stuffing gradually instead of waiting until the opening is tiny. Small amounts of fiberfill placed evenly create a smoother shape. Avoid pushing a hard ball of stuffing into the center because that can make the sides lumpy. The goal is a rounded, stable base that can sit upright and support the weight of the hat.
Check the shape from the front, side, and top as you work. If one side looks flatter, redistribute the stuffing before closing the piece. This is much easier than trying to fix the body after every accessory has been attached.
2. Add the Belly Detail
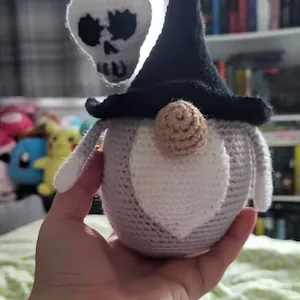
The pale belly panel is a simple detail, but it contributes a lot to the finished character. It separates the front from the back and gives the gnome a soft, almost plush-toy appearance. Before sewing, pin the belly in place and make sure its center line matches the center of the body.
Use small, even stitches around the edge. Pull the thread tight enough to secure the panel but not so tight that the edge puckers. If the belly is slightly curved, shape it with your fingers as you sew. A neatly attached belly makes the whole Halloween crochet gnome pattern look more polished.
3. Position the Gnome Nose
The nose is small, but its placement controls the expression. If it is too low, the hat can look disconnected from the face. If it is too high, the hat may cover it completely. Pin the nose temporarily, place the unfinished hat on the body, and check the relationship between the brim and nose before sewing anything permanently.
A soft neutral shade usually works best. Beige, peach, tan, or light brown can all look natural with the gray-and-black palette. You can also use a more whimsical color if your Halloween décor is playful rather than traditional.
4. Crochet and Shape the Arms
The arms should support the composition instead of competing with the main details. Keep them simple and symmetrical. Before attaching, lay the body on a flat surface and pin both arms at the same height. Look at the gnome from the front to make sure one arm is not angled farther forward than the other.
If you want the gnome to hold a miniature prop later, you can change the arm angle slightly. A tiny pumpkin, crochet candy bag, miniature broom, or small sign can turn the same base pattern into a personalized Halloween display piece.
5. Make the Long Pointed Hat
The hat is where the design becomes truly distinctive. A long taper creates the dramatic silhouette, while the curved tip gives the gnome a magical, slightly mischievous character. Maintain consistent tension as the circumference narrows. Uneven tension can create bumps along the taper that become more obvious in dark yarn under strong light.
Do not overstuff the hat. In many gnome designs, a lightly filled or strategically shaped hat bends more naturally than a firmly packed one. The exact pattern instructions will guide the shaping, but the general principle is to preserve flexibility. You want enough structure to display the skull and spider without turning the hat into a rigid cone.
Before sewing the brim to the body, test the angle. A hat tilted slightly to one side often looks more expressive than a perfectly vertical hat. The curve should complement the skull placement so the top does not appear visually heavy on only one side.
Pattern tip: If you prefer following exact rounds instead of estimating the shaping, use the Halloween crochet gnome PDF pattern while you work. It is much easier to keep the instructions beside your yarn than to guess the taper and accessory placement from finished photos.
6. Create the Crochet Skull
The skull is the strongest Halloween symbol in the design. Keep the base shape compact enough that it does not overpower the gnome. The eye areas should be dark and easy to recognize. The nose and teeth can be embroidered with small stitches, allowing you to control the expression.
For a cute skull, make the eyes rounded and keep the mouth simple. For a creepier skull, use slightly uneven eye shapes and a longer tooth line. For a stylized folk-art look, add tiny decorative stitches around the forehead or use a different contrast color for the mouth.
When attaching the skull to the hat, check that it faces outward rather than downward. The final gnome will often be displayed at eye level or photographed from slightly above, so the skull should remain visible from those common angles.
7. Crochet the Spider and Arrange the Legs
The spider brings texture to the side of the hat and helps fill the large dark area. Because the spider is relatively small, neat shaping makes a big difference. Keep the body compact, then arrange the legs so they spread visibly instead of stacking on top of one another.
Pin the spider to the hat before sewing. Move it slightly higher, lower, forward, or backward until the design feels balanced with the skull. If the skull is on the right side of the hat, placing the spider more toward the left can distribute the visual weight. If both accessories are on the same side, use the curve of the hat to keep them separated.
As you work through this Halloween crochet gnome pattern, keep checking the overall balance of the body, hat, and accessories rather than judging each piece on its own.
A Smart Assembly Order for Neater Results
Careful assembly is what gives a Halloween crochet gnome pattern its polished final look, especially around the hat, nose, skull, and spider.
Assembly is where many crochet projects go from “almost finished” to professional-looking. A good order reduces rework. For this design, begin by completing and stuffing the body. Attach the belly, then position the nose and arms. Next, place the hat temporarily so you can check the proportions. Once you are satisfied, secure the hat.
After the hat is stable, add the skull and spider. Finish with embroidery and tiny decorative details. This order keeps the most delicate features until the end, so they are less likely to be pulled, bent, or hidden while you handle the larger pieces.
Use pins generously. Pinning is not a sign that you are unsure; it is a finishing technique. Photograph the pinned arrangement with your phone, look at the image for a few seconds, and check whether the accessories appear centered and balanced. A photo often reveals asymmetry that is harder to notice while holding the project in your hands.
When sewing, use the same color yarn as the piece you are attaching whenever possible. Hide knots and yarn tails inside the body or hat. After weaving in the ends, gently reshape the project with your fingers. This final shaping is especially important for the brim, skull, and spider legs.
Creative Ways to Customize Your Halloween Gnome
One of the best parts of this Halloween crochet gnome pattern is how easily you can personalize the colors and Halloween details without changing the basic construction.
Once you understand the construction, customization becomes one of the most enjoyable parts of the project. You can keep the original spooky black-and-gray look or create a completely different character while preserving the recognizable silhouette.
One easy variation is to change only the hat. A pumpkin-orange hat makes the gnome brighter and more traditional. Purple creates a witchy fantasy look. Acid green gives the character a playful monster theme. Cream or beige can turn the design into a softer farmhouse Halloween decoration.
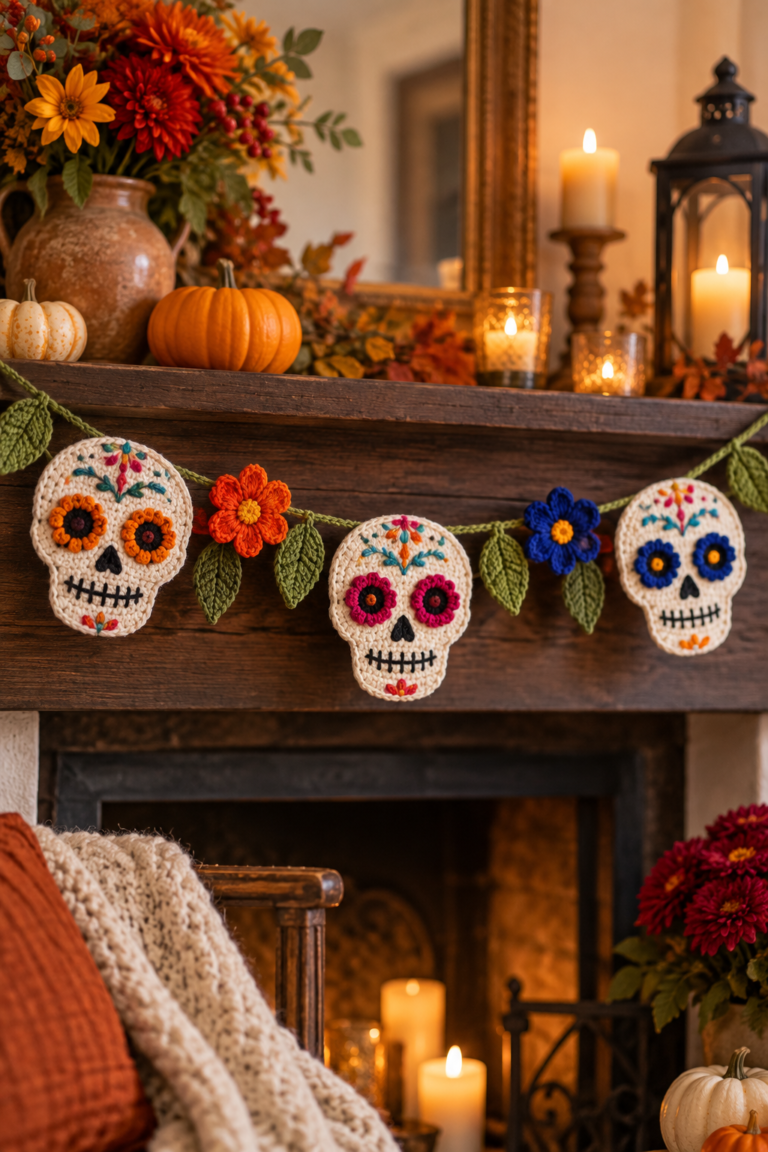
You can also customize the skull. Add a stitched crack across the forehead, change the eye shapes, embroider tiny flowers for a sugar-skull-inspired variation, or use gray instead of black for softer contrast. Keep the facial details simple enough that they remain readable at a small scale.
The spider can become a major feature or a subtle accent. Use black for a classic spider, gray for a softer monochrome effect, purple for a whimsical version, or metallic thread as a decorative highlight. You can also make a tiny web with surface embroidery on the hat, then place the spider near the web.
For an autumn display, surround the finished Halloween crochet gnome pattern with crochet pumpkins, dried leaves, acorns, or warm wood textures. For a gothic display, pair it with black candles, dark books, silver accents, and deep red fabric. For a kid-friendly display, use bright pumpkins, candy colors, and smiling faces.
How to Get Smooth Amigurumi Shaping
Smooth shaping makes a big difference in any Halloween crochet gnome pattern, because even stuffing and steady tension help every curve look intentional.
Even tension is one of the biggest differences between a handmade project that looks clean and one that looks uneven. Try to hold the yarn the same way throughout the body. If you take a long break and your tension changes when you return, crochet a few stitches, compare them with the previous round, and adjust before continuing.
Stuffing should support the crochet fabric, not stretch it dramatically. If white fiberfill is visible through the gray body, the fabric may be too loose or overstuffed. Remove a small amount of filling and massage the surface until it looks smoother. For the skull, use smaller amounts of stuffing so you can control the shape more precisely.
Round pieces often become slightly polygonal when increases are stacked in the same places. Many patterns address this through their shaping sequence. Follow the pattern carefully instead of moving increases randomly, especially if you want your Halloween crochet gnome pattern to match the intended silhouette.
For small pieces such as the nose or spider body, use the blunt end of your crochet hook or a stuffing tool to place tiny amounts of fiberfill. This prevents overfilling and keeps the small shape soft rather than rock hard.
How to Make the Witch Hat Look Intentional
The long witch hat is the signature feature of this Halloween crochet gnome pattern, so take extra time to shape its curve before final attachment.
A long crochet hat can look charmingly crooked, but there is a difference between an intentional curve and an accidental collapse. Before attachment, place the hat on the body and experiment with several bends. Notice where the fabric naturally wants to fold. Use that natural direction instead of forcing the hat against its structure.
The brim should sit firmly enough that the hat appears connected to the gnome. If the brim ripples excessively, smooth it with your fingers and check the sewing tension. If it flips upward, the attachment may be pulling too tightly in one area.
The skull adds weight to the upper section, so position it before finalizing the curve. The spider adds less weight but can visually exaggerate one side. Look at the entire silhouette, not just each accessory individually.
Common Mistakes and How to Fix Them
Most problems in a Halloween crochet gnome pattern are easy to fix when you catch them early, especially issues with stuffing, placement, or accessory scale.
The Body Will Not Sit Upright
If the body keeps rolling or leaning, first check the stuffing. The bottom may be too round or the filling may be uneven. Massage the base to flatten it slightly and redistribute the fiberfill. Also check whether the hat is pulling the body backward. A very heavy skull or overstuffed hat can shift the center of gravity.
The Skull Looks Too Large
Do not panic if the skull looks large when held by itself. Pin it to the hat and step back. If it still dominates the entire design, compare your yarn weight and hook choice with the pattern. A thicker yarn or looser tension can enlarge small accessories quickly.
The Spider Disappears Against the Hat
A black spider on a black hat can lose definition. Position it where light will catch the legs, or use dark gray, silver-gray, purple, or another near-black shade. You can also outline part of the spider with a tiny amount of lighter yarn if the style suits your gnome.
The Belly Is Off-Center
If you notice the problem before the entire edge is sewn, remove a few stitches and repin. It is worth correcting because the belly creates a strong visual center line. Use the nose and the lower center of the body as alignment points.
The Hat Covers the Nose
Test the hat before permanently attaching it. If the brim sits too low, raise the front slightly while keeping the back secure. A small adjustment can reveal the nose without changing the overall fit.
The Embroidery Looks Uneven
Remove only the stitches that bother you rather than restarting the entire skull. Use shorter embroidery stitches, work slowly, and check symmetry after every few stitches. Handmade faces do not need machine-perfect symmetry; small differences can give the skull character.
How to Photograph Your Finished Halloween Crochet Gnome
This project is naturally photogenic, especially for Pinterest, blog posts, and seasonal social media. Use soft window light whenever possible. Place the gnome near a window but not in harsh direct sunlight. A neutral wall, wood surface, autumn leaves, pumpkins, plants, or simple Halloween props can create a strong background without competing with the crochet details.
Take at least one clean front photo, one three-quarter angle, one close-up of the skull and spider, and one wider seasonal scene. The clean front image is useful for showing the overall Halloween crochet gnome pattern, while the detail shots help viewers appreciate the handmade texture.
Keep the camera near the gnome’s eye level for the hero image. If you shoot from too high above, the body can look shorter and the hat curve can be distorted. For detail images, move closer instead of using heavy digital zoom so the yarn texture stays sharp.
Halloween Display Ideas for the Finished Gnome
A finished Halloween crochet gnome pattern can become the centerpiece of a cozy autumn shelf, mantel, entryway, or handmade Halloween display.
A finished crochet gnome works well on a mantel, entryway table, bookshelf, craft-room shelf, coffee bar, or Halloween party display. Because the project already contains several strong details, the surrounding décor does not need to be complicated.
For a simple setup, place the gnome next to one medium pumpkin and a small bundle of autumn leaves. For a cozy look, add a warm lamp, a stack of books, and a neutral woven runner. For a spooky setup, use black fabric, faux cobwebs, paper bats, and dim warm lighting. For a whimsical setup, combine multiple crochet pumpkins in orange, cream, and green.
If you make several versions of the Halloween crochet gnome pattern, vary the hat colors while keeping the body style consistent. A black-hat gnome, orange-hat gnome, and green-hat gnome can look like a coordinated collection without requiring three completely different patterns.
Is This Halloween Crochet Gnome Good for Beginners?
If you are a confident beginner, this Halloween crochet gnome pattern becomes much more manageable when you treat it as several small crochet pieces instead of one complicated project.
A brand-new crocheter may find the project easier after practicing a few basic amigurumi skills first. The body itself is based on common shaping ideas, but the combination of a long hat, skull, spider, embroidery, and assembly creates more steps than a very simple beginner plushie.
If you already know how to make a magic ring or your preferred starting ring, work single crochet in rounds, increase, decrease, fasten off, stuff a piece, and sew two crochet pieces together, the project should feel much more approachable. Work one component at a time and avoid rushing the final assembly.
Beginners often assume that a complex-looking project must be crocheted all at once. In reality, this design is a collection of manageable shapes. Finish the body. Take a break. Make the hat. Then make the skull. Then the spider. That mindset makes the Halloween crochet gnome pattern less intimidating and more enjoyable.
Prefer exact step-by-step instructions?
The full PDF is the easiest way to follow the project without guessing the stitch counts, shaping, or assembly sequence. Keep it open beside you while you crochet and check each section as you finish it.
Why Use the Printable PDF Pattern?
The printable PDF makes this Halloween crochet gnome pattern easier to follow when you want exact stitch counts, shaping instructions, and assembly guidance beside you.
Inspiration photos are useful for understanding the look of a project, but a detailed pattern removes the guesswork. You do not need to estimate how quickly the body widens, where the hat begins to narrow, or how the smaller accessories are shaped. You can focus on your tension and finishing instead of reverse-engineering the design.
A PDF is also convenient because you can keep it on your phone or tablet, zoom in on the instructions, or print the pages you want beside your crochet basket. If you stop halfway through the project, you can return later without trying to remember where you left off.
The downloadable Gnome Crochet PDF Pattern is the best companion to this article when you are ready to make the project. This guide gives you the planning, styling, finishing, and troubleshooting advice; the PDF gives you the exact pattern instructions.
Care and Storage Tips
Proper storage helps your Halloween crochet gnome pattern keep its body shape, hat curve, and small sewn details ready for the next Halloween season.
Seasonal crochet décor often spends most of the year in storage, so a little care helps preserve its shape. Before packing the gnome away, make sure it is completely dry and free from dust. Store it in a clean box where the long hat will not be crushed under heavy decorations.
If the hat bends during storage, reshape it gently with your fingers before displaying it again. Avoid pulling directly on the skull or spider. Support the hat itself while adjusting the curve. Small accessories can be protected with tissue paper or soft fabric.
For light dust, use a soft brush or a gentle burst of cool air from a distance. Follow the washing guidance for the specific yarn you used. Because the project includes multiple sewn and embroidered details, rough machine washing may not be ideal for every version.
Four Halloween Gnome Variations to Try
After making one Halloween crochet gnome pattern, you can reuse the same idea for several color variations and create a coordinated spooky-cute collection.
Classic Black Witch Gnome
Use a black hat, gray body, white skull, black spider, and cream belly. This is the most versatile version and works with almost any Halloween décor style.
Pumpkin Witch Gnome
Change the hat to orange, keep the skull cream, and use a dark charcoal body. A black spider will stand out clearly against the orange background. Add a tiny green accent if you want the palette to echo a pumpkin stem.
Toxic Green Gnome
Use bright green for part of the hat or body, black for the spider, and gray for the skull details. This version feels playful, modern, and bold. It photographs especially well outdoors or against dark backgrounds.
Vintage Neutral Halloween Gnome
Choose faded black, warm gray, oatmeal, ivory, and muted brown. This softer palette works well with rustic wood, old books, dried leaves, and farmhouse-style autumn décor.
Each variation uses the same visual idea, so once you complete the Halloween crochet gnome pattern once, you can plan a second version more quickly and confidently.
Frequently Asked Questions
These quick answers cover the most common questions crocheters have before starting a Halloween crochet gnome pattern.
What is the best yarn for a Halloween crochet gnome?
A smooth, amigurumi-friendly yarn that creates dense stitches is a good choice. Medium-weight acrylic, cotton, or a cotton blend can all work. The most important thing is to keep the yarn thickness consistent across the body, hat, skull, and accessories unless the pattern specifically calls for a different weight.
Can I make the gnome in different Halloween colors?
Yes. Black, gray, and cream create the classic look, but orange, purple, green, burgundy, and warm neutrals can all work. Keep enough contrast between the skull and hat so the facial details remain visible.
Do I need safety eyes?
The skull design can be created with crochet and embroidery details, so safety eyes may not be necessary. Follow the exact materials list in your PDF pattern for the intended finish.
How do I stop the body from showing stuffing?
Use firm, even tension and a hook size that creates dense fabric. Add stuffing gradually rather than stretching the body as full as possible. If the gaps are large, reducing the hook size slightly may help.
How should I attach the spider to the hat?
Pin it in place first, spread the legs so they remain visible, then sew it securely with matching yarn. Check the position from the front and side before tying off the final yarn end.
Can I make the hat orange instead of black?
Absolutely. An orange hat is one of the easiest ways to create a pumpkin-inspired variation. The skull and black spider will also stand out strongly against orange yarn.
Is this Halloween crochet gnome pattern beginner-friendly?
It is best for a confident beginner who already understands basic amigurumi techniques or for an intermediate crocheter. If you are brand new, practice working in rounds, increasing, decreasing, stuffing, and sewing first.
Where can I get the complete pattern?
You can get the full digital PDF here: Halloween Gnome Crochet PDF Pattern. The PDF is the version to use when you need the exact stitch-by-stitch instructions.
Can I use this project as Halloween home décor?
Yes. The finished gnome works well on shelves, mantels, entry tables, craft-room displays, party tables, and autumn arrangements. Pair it with pumpkins, leaves, candles, books, or other crochet decorations.
How can I make the skull look less scary?
Use rounder eye shapes, a small embroidered mouth, softer gray details instead of deep black, and a warm cream yarn for the skull. These changes can make the expression feel more cute than creepy.
Make Your Own Spooky Crochet Gnome
This project combines everything that makes seasonal crochet fun: a recognizable Halloween theme, a cozy handmade texture, dramatic color contrast, and plenty of room for personal touches. The body is soft and simple, while the curved witch hat, skull, and spider transform it into a decoration people will notice immediately.
Take your time with the shaping and assembly. Pin the details before sewing, check the design from several angles, and use the color palette that best fits your home. Whether you choose classic black and gray, pumpkin orange, eerie green, or a softer vintage palette, the finished Halloween crochet gnome pattern can become a favorite piece of handmade October décor.
For more beginner-friendly crochet inspiration, tutorials, and amigurumi ideas, explore Amigurumi Bunny. And when you are ready to make this exact gnome, use the full PDF so you can follow the detailed instructions from the first stitches to the final spider leg.
Ready to crochet the Halloween Gnome & Spider?
Get the complete printable digital pattern and start your spooky seasonal project.
MAKE THIS GNOME
Your spooky crochet night starts here.
Grab the full printable pattern, pick your yarn colors, and work through the project at your own pace.
Get the Halloween Gnome PDF →
One Comment
Comments are closed.